Quick Facts
- Category
- Nage-Waza
- Subcategory
- Ashi-Waza
- Difficulty
- Advanced
- Belt Level
- 2nd kyu, 1st kyu
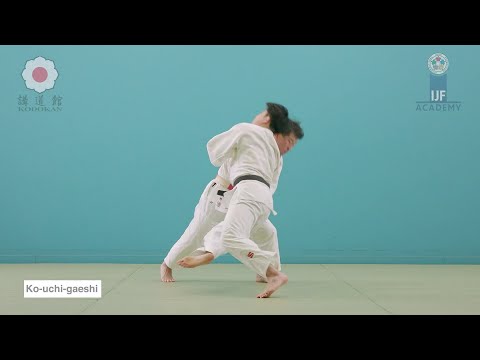
Ko-Uchi-Gaeshi is the counter-throw to Ko-Uchi-Gari. When uke hooks inward with Ko-Uchi-Gari against tori's rear heel or ankle, tori steps over or around uke's hooking leg and immediately sweeps uke's supporting (base) leg with O-Soto-Gari or De-Ashi-Barai. The escape step simultaneously defeats uke's hook and positions tori for a counter sweep. Part of the Kodokan Shinmeisho no Waza, it demonstrates how a small commitment (Ko-Uchi-Gari) can still create a full-throw counter opportunity.
Ko-Uchi-Gaeshi — Step by Step
Ko-Uchi-Gari is a subtle attack, but when committed, uke's hooking leg is committed inward and their weight shifts over the supporting leg. The counter exploits this moment of single-leg dependence. By stepping over or around the hook, tori removes uke's reaping contact while simultaneously threatening the loaded support leg.
As uke's foot hooks inward against your heel or ankle, lift or step your threatened foot over uke's hooking leg. This escapes the hook and simultaneously moves you to the outside of uke's base. Your weight shifts to your free leg, which now positions to attack uke's support.
Apply De-Ashi-Barai (sweeping uke's supporting foot laterally as their weight is on it) or O-Soto-Gari (reaping the support leg from behind). The choice depends on position: if uke's support foot is lateral and weight-bearing, De-Ashi-Barai; if you are positioned behind uke's support leg, O-Soto-Gari. Coordinate the sweep with an arm pull.
- 1
Detect uke's Ko-Uchi-Gari hook
Feel uke's foot driving inward toward your heel or inner ankle. Ko-Uchi-Gari is a smaller, quicker attack than O-Uchi-Gari — the hook is tighter and lower.
- 2
Lift or step the threatened foot over uke's hook
Raise the targeted foot and step it over uke's hooking leg, escaping the hook before it can load. The step should carry you to the outside of uke's attacking position.
- 3
Identify uke's supporting leg
As you step over the hook, uke's weight is on their supporting leg. Identify which leg is bearing weight — this is your target.
- 4
Apply De-Ashi-Barai or O-Soto-Gari to the support
Sweep uke's supporting foot laterally (De-Ashi-Barai) or reap it from behind (O-Soto-Gari). The sweep timing coincides with uke's maximum weight commitment to that leg.
- 5
Coordinate arm control with the sweep
Pull uke's arms in the direction of the sweep — sleeve grip pulls toward the counter throw. The combined arm pull and leg sweep complete the throw.
What Makes It Work
- The escape step over uke's hook is the foundation — it simultaneously defeats the Ko-Uchi-Gari and transitions into counter position.
- Counter sweep mechanics are the same as the primary techniques (De-Ashi-Barai or O-Soto-Gari) — the difference is in the timing and context.
- Ko-Uchi-Gari is a quick, subtle attack; the counter must match its pace. A slow response misses the committed phase.
- Uke's supporting leg is always the target in ashi-waza counters — attack the leg bearing weight, not the attacking leg in the air.
- The step over the hook does not need to be a large movement — a small, sharp lift and step-through is sufficient.
What to Avoid
Stepping away from the hook rather than over it
Step over uke's hooking foot, not away from it. Stepping away simply retreats and removes the counter opportunity.
Counter too late — uke has already recovered from the hook
The transition from step-over to counter sweep must be immediate. If uke's hook is already withdrawn, the counter timing has passed.
Targeting uke's hooking leg instead of the support
After stepping over the hook, focus on the supporting leg. The hooking leg is returning to the mat — it is not in the ideal counter sweep position.
No arm pull — counter sweep alone is insufficient
Pull uke's arms in the direction of the throw. The leg sweep and arm pull must combine to create the topple.
Best Moments to Apply Ko-Uchi-Gaeshi
Ko-Uchi-Gaeshi is most effective against opponents who use Ko-Uchi-Gari frequently and with commitment — particularly those who drive the hook deep and load their weight into the attack. It is also applicable when uke uses Ko-Uchi-Gari as a setup to create movement, as the counter can be applied during the commitment phase before they transition. In competition, establishing this counter discourages repeated inner-heel attacks.