Quick Facts
- Category
- Nage-Waza
- Subcategory
- Ashi-Waza
- Difficulty
- Advanced
- Belt Level
- 2nd kyu, 1st kyu, 1st dan
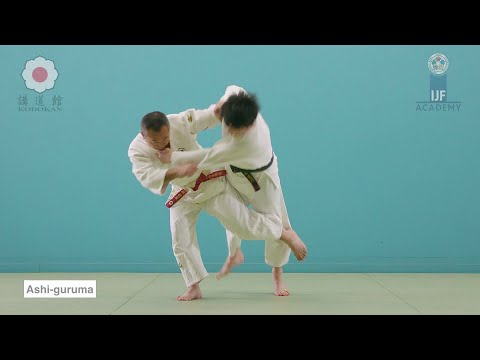
Ashi-Guruma is an advanced leg wheel throw in which tori places their leg horizontally across uke's thighs or lower body and uses a turning arm action to wheel uke over the extended leg. The leg acts as a fixed axle — like a wheel's axis — and the arm action rotates uke around it. It combines elements of hip throws and leg techniques, requiring precise positioning and timing. Visually similar to Harai-Goshi, but the key distinction is that the leg is placed horizontally across uke's body rather than sweeping through.

Ashi-Guruma — Step by Step
Pull uke strongly forward and upward onto their right front corner. The lapel arm draws uke's upper body forward while the sleeve arm lifts and forward-extends. Uke's body should be tilted forward with weight on their toes before tori extends the blocking leg.
Pivot to face the same direction as uke, stepping the right foot across and in front. As you complete the turn, extend your left leg horizontally across uke's thighs — the calf or lower shin contacts uke's thigh region. Your leg must be extended and firm, creating a horizontal bar across uke's forward path.
With the leg extended as the wheel's axis, execute a sharp forward bend and rotate your upper body. Pull the sleeve arm in a large downward arc while the lapel arm pushes upward. Uke's body pivots over your extended leg, rotating forward and sideward in a wide arc to land on the mat.
- 1
Create forward imbalance
Pull uke forward and upward with both arms, breaking their balance to their front. Uke rises onto their toes and leans forward.
- 2
Pivot to face the same direction
Step your right foot forward and across, then pivot your body to face the same direction as uke. Your pivot should be smooth and committed.
- 3
Extend the blocking leg
As you complete the pivot, extend your left leg horizontally across uke's thighs. Keep the leg firm and extended — this is the wheel axle.
- 4
Lock body position and arms
Your back should be pressed toward uke's front side. Confirm that your extended leg is making solid contact across uke's thighs.
- 5
Rotate uke over the leg
Bend forward sharply from the waist. Pull the sleeve arm in a large downward arc and push-rotate the lapel arm upward. Uke wheels over the extended leg.
What Makes It Work
- The extended leg must be positioned horizontally and firmly across uke's thighs — any bend in the leg or wrong placement allows uke to step over it.
- The wheel action is powered entirely by the arms and the body rotation — the leg is passive (a fixed axle) once placed.
- Forward kuzushi must be established before placing the leg; a balanced uke will simply step around a placed leg.
- The entry and leg placement must be fast — a slow entry gives uke time to post or step over.
What to Avoid
Placing the leg at knee level instead of thigh level
The blocking leg should contact uke at mid-thigh level. At knee level, uke can bend their knee over the leg and escape; too high and the leverage is poor.
Bending the blocking leg during kake
The leg must remain extended and firm throughout the throw. A bending leg collapses as uke's weight comes onto it.
Insufficient kuzushi before leg placement
Uke must be leaning forward before the blocking leg is placed. Against a balanced uke, the throw cannot generate rotation.
Confusing Ashi-Guruma with Harai-Goshi
In Harai-Goshi, the leg sweeps upward and through. In Ashi-Guruma, the leg is placed stationary as a horizontal bar. The throwing arm action is also wider and more circular in Ashi-Guruma.
Best Moments to Apply Ashi-Guruma
Ashi-Guruma is effective against opponents who have a strong forward lean or who step in aggressively. It is useful when uke's defensive posture keeps their hips back (preventing a hip throw entry), as the leg placement does not require deep hip contact. It can be executed from a lateral position relative to uke.
Combination Sequences
Attack these first
Follow up with