Quick Facts
- Category
- Katame-Waza
- Subcategory
- Osaekomi-Waza
- Difficulty
- Beginner
- Belt Level
- 5th kyu, 4th kyu
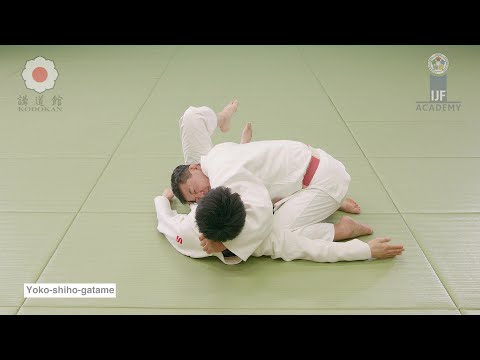
Yoko-Shiho-Gatame is the most common hold-down used in competition judo. Tori controls uke from the side, pinning both their shoulders to the mat. One arm traps between uke's legs gripping their belt or trousers, the other controls uke's near arm and neck. The four-point contact of hands gives stable, rotational control.
Yoko-Shiho-Gatame — Step by Step
- 1
Position at uke's right side, perpendicular to their body
Kneel at uke's right side with your chest facing toward their feet. You are perpendicular to uke, facing toward their legs.
- 2
Thread your left arm between uke's legs
Slide your left arm between uke's legs and grip their belt, trouser hem, or the mat. This controls uke's lower body and prevents the bridge escape.
- 3
Wrap your right arm around uke's neck/head
Wrap your right arm under uke's neck, reaching to control their head, or trap uke's near arm under your armpit. The head control version is stronger for preventing uke's rotation. Grip their far collar or lapel.
- 4
Drive your chest onto uke's chest
Lower your chest down onto uke's sternum, applying body weight directly. Spread your knees wide for a stable base.
- 5
Maintain position and adjust to uke's escape attempts
Keep your weight on uke's chest. If uke turns into you, flow to Kami-Shiho-Gatame or mount. If they turn away, switch to the other side.
What Makes It Work
- The arm between the legs prevents the hip bridge escape — this is the critical control point.
- Chest-to-chest contact: your body weight on uke's chest pins them.
- Wide knee base: spread your knees to lower your center of gravity.
- Follow uke's movement — if they roll, you roll with them rather than fighting their motion.
What to Avoid
Not threading the arm between the legs
This arm is essential for holding the lower body. Without it, uke bridges and rolls you off.
Kneeling rather than spreading the legs wide
Spread your knees wide on the mat. A high kneeling position is easily rolled.
Holding too rigidly — fighting uke's roll
If uke rolls one way, flow to a different pin. Fighting directly against rotation is tiring and unsuccessful.
Placing a knee or hip on top of uke
In competition, kneeling or sitting on uke is prohibited (interpreted as kakaekomi). Keep your knees on the mat and your weight distributed through your chest and arms, not on top of uke's body.
Best Moments to Apply Yoko-Shiho-Gatame
Yoko-Shiho-Gatame transitions naturally from throws where uke lands on their back and tori is at their side. It is the most versatile hold-down for transitioning to pins on either side. From Yoko-Shiho-Gatame, tori can easily transition to mount, Kami-Shiho-Gatame, or arm locks.