Quick Facts
- Category
- Nage-Waza
- Subcategory
- Te-Waza
- Difficulty
- Intermediate
- Belt Level
- 4th kyu, 3rd kyu
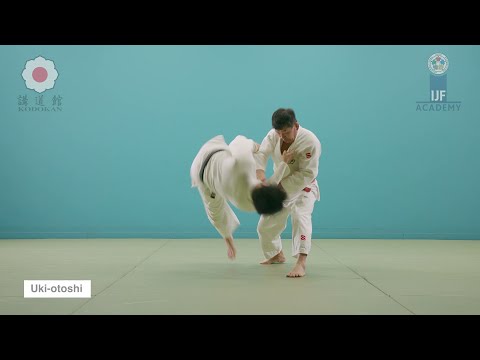
Uki-Otoshi is one of the oldest and most elegant techniques in judo, appearing as the first throw in the Nage-no-Kata. Tori drops to one knee while pulling uke sharply forward and downward, using pure arm and body mechanics — no hip or leg contact with uke — to float them off balance and project them to the mat. It exemplifies the principle of ju (yielding) and minimal effort.

Uki-Otoshi — Step by Step
Pull uke sharply forward and upward onto their right front corner with both hands. The sleeve grip elevates and pulls uke's arm forward; the lapel grip pulls their chest toward you. Uke must be committed forward with their weight fully on their toes before tori drops.
As uke steps forward with their right foot, step back and to the side with your left foot. Begin lowering yourself by bending your left knee. Your entire body retreats and drops in one smooth motion — you are not simply stepping back, you are guiding uke's forward momentum into the throw.
Drop to your left knee as you pull uke's weight forward and down. Your hands guide uke's upper body in a large arc — forward, down, and to the right. There is no direct body contact with uke's torso. Uke floats over the void created by your dropping body and lands on the mat in front of you.
- 1
Establish forward kuzushi
Pull uke's sleeve arm upward and forward. The lapel hand pulls uke's chest toward you. Uke's weight shifts to their right front corner and onto their toes.
- 2
Step back and begin the drop
As uke steps forward, retreat with your left foot diagonally to your left rear. Begin lowering your body by bending the left knee.
- 3
Drop to the left knee
Lower your left knee to the mat in a controlled drop. This sudden lowering creates a void beneath uke's forward-falling body.
- 4
Guide uke in a forward arc
Pull both hands in a large circular arc — forward, downward, and to the right front. Your arm pull guides uke's upper body over and down.
- 5
Complete the projection
Uke's forward momentum carries them over the void and onto the mat. Maintain grip control and follow through the full arc to drive uke completely to the ground.
What Makes It Work
- Timing is everything — the drop must coincide exactly with uke's committed forward step. Too early and uke simply stops; too late and the moment is lost.
- There is no hip or leg contact with uke. The throw is pure arm mechanics and body drop, making timing and kuzushi the only factors.
- The arc of the arm pull is large and circular, not a simple downward yank. Think of drawing a large circle from uke's chest to the ground.
- Uki-Otoshi works best when uke is moving forward with momentum — it uses that momentum rather than generating power.
What to Avoid
Dropping before uke is fully committed forward
Wait until uke has fully stepped forward and their weight is on their front foot. Dropping early lets uke simply stop or step around you.
Pulling straight down instead of in an arc
The pull must guide uke forward first, then down and to the right. A straight downward pull has no projection force.
Dropping too close to uke (no space created)
Step back sufficiently before dropping. You must create a void for uke to fall into. Staying close negates the floating effect.
Using muscle to force the throw
Uki-Otoshi relies entirely on uke's forward momentum. If uke is not moving forward, attempting to muscle the throw will fail. Create movement first.
Best Moments to Apply Uki-Otoshi
Uki-Otoshi is most effective when uke is advancing aggressively or has been lured into a strong forward push. It is a classical Nage-no-Kata technique and teaches the principle of using uke's energy. In randori or shiai it is used as a surprise drop when uke charges in, or as a counter to aggressive forward pressure.