Quick Facts
- Category
- Katame-Waza
- Subcategory
- Kansetsu-Waza
- Difficulty
- Advanced
- Belt Level
- 2nd kyu, 1st kyu, 1st dan
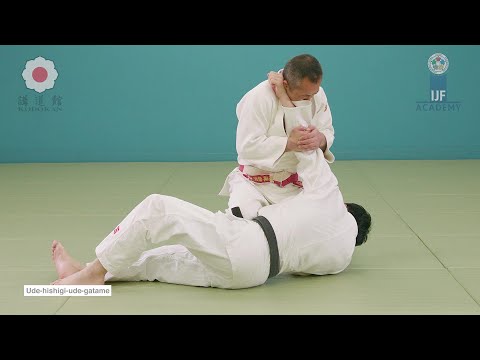
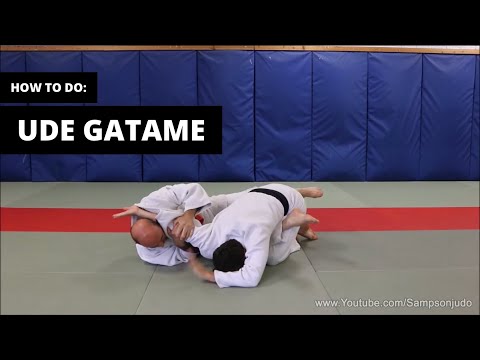
Ude-Gatame is a straight armlock that hyperextends uke's elbow by pressing the arm against tori's chest or body using both hands on the wrist and forearm. Unlike Juji-Gatame which uses the hips as the fulcrum, Ude-Gatame uses tori's own body as a frame to lever the elbow joint. It can be applied from various positions including guard, side control, or while kneeling, and is characterised by the use of the body (rather than a body part placed at the elbow) to create the locking pressure.

Ude-Gatame — Step by Step
Secure uke's wrist firmly and extend their arm. Rotate uke's arm so the elbow faces upward or in the direction of intended leverage. Keep uke's shoulder controlled to prevent them from rotating the entire arm to escape.
Grip uke's wrist with both hands — one hand gripping the wrist itself, the other gripping just above the wrist on the forearm. Pull uke's arm straight and press the back of their wrist against your chest, shoulder, or armpit. Your body provides the fulcrum against which uke's elbow is levered.
With uke's wrist pressed against your body and the arm extended, pull the wrist into your chest while preventing elbow flexion. Your body acts as the rigid surface against which the wrist is pressed; the elbow, unable to flex forward into your body, is forced into hyperextension. Maintain firm body contact throughout — if uke's wrist pulls free from your chest, the lock releases.
- 1
Secure the wrist with both hands
Grip uke's wrist with two hands — wrist and forearm grip. Pull the arm extended and away from uke's body.
- 2
Supinate uke's arm
Rotate uke's arm palm-up (supinate). This aligns the elbow for hyperextension and prevents uke from bending the elbow into a natural defensive position.
- 3
Pull the wrist to your chest
Draw uke's wrist toward your chest, pressing the back of the wrist against your sternum or armpit. Your body becomes the lever base.
- 4
Ensure the arm is straight
Confirm uke's arm is fully extended with the elbow pointing away from your body. Any bend gives uke room to flex before the lock activates.
- 5
Apply pressure through the wrist
Pull the wrist into your body while preventing elbow flexion. The locked arm hyperextends over your body frame. Control the pressure — apply gradually.
What Makes It Work
- Your body is the lever base — unlike other armlocks, there is no separate fulcrum placed at the elbow; your chest/shoulder presses against the arm.
- The arm must be fully extended and supinated to create the hyperextension angle.
- Two-hand wrist control is mandatory — one-hand grips allow wrist rotation that defeats the lock.
- Uke's shoulder must be controlled to prevent arm rotation; a free shoulder can rotate the arm from a bad angle to a safe one.
What to Avoid
Arm not fully extended before applying pressure
Pull the arm fully straight first. Any residual elbow bend gives uke range of motion to resist the lock.
Single-hand wrist grip
Two hands are required. One on the wrist, one on the forearm prevents rotation. Single-hand grips allow uke to twist their arm and escape.
Applying lock toward the natural elbow bend direction (palm down)
Supinate the arm (palm up) before applying pressure. Locking toward the natural bend direction is weaker and risks pressing on the wrist rather than hyperextending the elbow.
Not controlling uke's shoulder
If uke can freely rotate their shoulder, they can redirect the force. Use your body position or a second contact point to limit shoulder rotation.
Best Moments to Apply Ude-Gatame
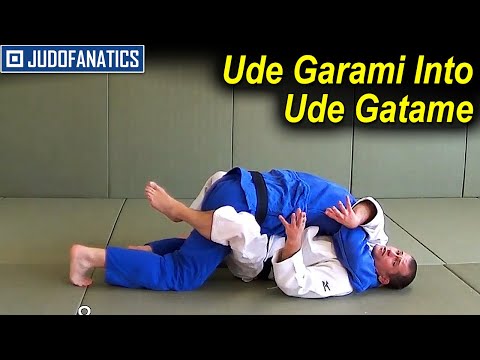
Ude-Gatame is applied when uke extends a straight arm — particularly when posting on a straight arm from the bottom, when pushing tori away in a ground scramble, or when uke's arm is caught outstretched during a transition. It is a high-speed application technique well-suited to competition transitions because it can be applied quickly without repositioning to a classical Juji-Gatame setup.
Combination Sequences
Attack these first
Follow up with