Quick Facts
- Category
- Nage-Waza
- Subcategory
- Koshi-Waza
- Difficulty
- Intermediate
- Belt Level
- 4th kyu, 3rd kyu
Tsuri-Goshi is a hip throw distinguished by a lifting grip on uke's belt at the back. Rather than wrapping the waist with the arm (as in O-Goshi), tori reaches around and grips uke's belt, then lifts and loads uke's weight onto the hip before projecting them forward. This belt grip provides exceptional control over uke's centre of gravity and makes the throw difficult to escape once established.

Tsuri-Goshi — Step by Step
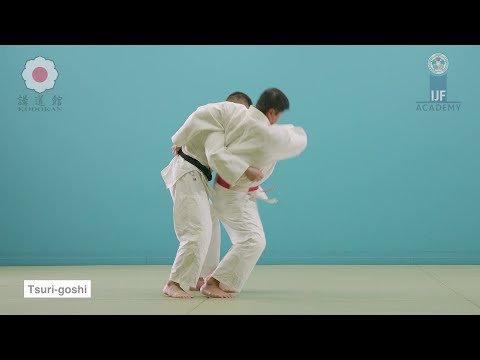
Draw uke forward and upward with the sleeve grip, pulling them onto their right front corner. Simultaneously, the belt-reaching arm pulls uke's mid-section in close so their hips are pressed against yours. Uke should rise onto their toes with their weight shifted forward.
Step your right foot in between uke's feet, then pivot 180 degrees to face the same direction as uke. As you pivot, reach your right arm behind uke and grip their belt at the back (or lower back of the judogi). Pull the belt grip toward you as you complete the turn, pressing uke's hips firmly into your hip region.
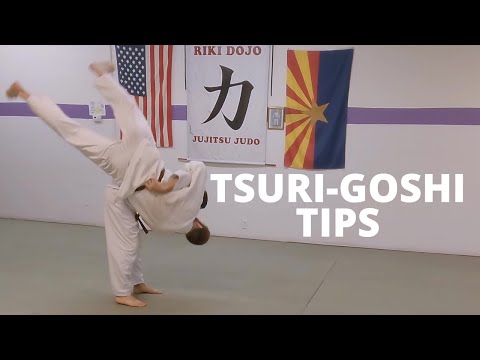
With the belt grip lifting uke's hips upward and the sleeve arm pulling down and across, bend forward from the waist. The combination of the belt lift and the forward bend pivots uke over your hip. Uke is projected in a high arc over your hip to land on the mat in front of you.
- 1
Break balance with sleeve and pull
Pull uke's sleeve upward and toward their right front corner. Your lapel hand simultaneously draws their upper body in close.
- 2
Step in with the right foot
Drive your right foot in front of uke's right foot, planting it between their feet with toes angled outward.
- 3
Pivot and establish belt grip
Pivot 180 degrees, swinging your left foot around. As you turn, reach your right arm behind uke and grip the back of their belt firmly.
- 4
Pull belt and load uke's weight
Draw the belt grip toward you while pressing your hip into uke. Bend your knees so your hip is slightly lower than uke's centre of gravity, then straighten to load their weight.
- 5
Lift, bend, and project
Lift with the belt grip while bending forward sharply. Uke is lifted and rotated over your hip, landing to the mat in front of you.
What Makes It Work
- The belt grip is the defining feature — grip deep at the back of the belt for maximum lifting leverage.
- Pull uke's hips in tight before the throw; any space between your hip and uke's breaks the lifting fulcrum.
- Lift with the belt arm and bend with the body simultaneously — both actions together power the rotation.
- Keep your back straight during entry; a rounded back during the pivot weakens hip placement.
What to Avoid
Gripping the back of the jacket instead of the belt
The belt grip provides a rigid, high-leverage hold on uke's centre of gravity. Gripping loose fabric gives poor control.
Hip placed too high, lifting uke off the ground inefficiently
Lower your body slightly during entry so the hip is at or below uke's hip. Straighten the legs to load rather than pressing up with the hip.
Insufficient forward bend during kake
The throw requires the torso to drive forward and down. Staying upright with just a belt lift produces a weak, incomplete throw.
Not completing the pivot before gripping the belt
Establish your full body position first, then secure the belt grip. Grabbing the belt mid-turn results in a poor hip angle.
Best Moments to Apply Tsuri-Goshi
Tsuri-Goshi is particularly effective against opponents who drop their hips defensively or who grip low. The belt grip bypasses arm and upper body defences, going straight to their centre of mass. It is useful in situations where a standard lapel-to-waist entry (O-Goshi) is defended, and works well as a transition from a failed grip-fighting exchange.