Quick Facts
- Category
- Katame-Waza
- Subcategory
- Kansetsu-Waza
- Difficulty
- Intermediate
- Belt Level
- 3rd kyu, 2nd kyu, 1st kyu
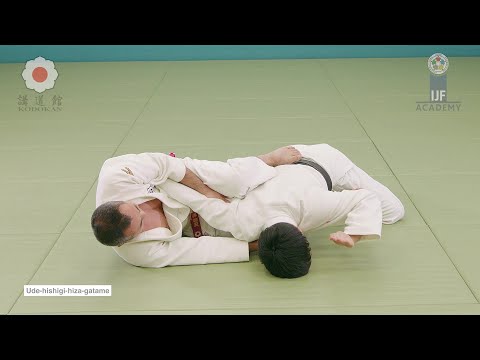
Hiza-Gatame is a standing or kneeling armlock in which tori uses their knee to apply hyperextension pressure to uke's elbow joint. The technique is applied while uke is on the ground — tori controls uke's wrist and places their knee against uke's elbow, then straightens or levers the arm over the knee joint. It is unique among armlocks for its application while tori remains partially standing or kneeling, making it a natural transition from throwing positions.
Hiza-Gatame — Step by Step
Control uke's wrist firmly with both hands, pulling their arm straight and away from their body. Uke must not be able to bend their elbow or rotate their wrist. The arm must be extended in a straight line with the elbow accessible.
From a standing or kneeling position over uke, place your knee on the ground directly against the back of uke's elbow joint. Your knee acts as the fulcrum. Maintain wrist control with your hands, keeping uke's arm straight and the palm facing upward (supine position) to expose the elbow to hyperextension.
With the knee positioned behind uke's elbow, apply downward pressure through the knee while lifting uke's wrist upward and toward your body. This levers the elbow over the knee fulcrum, applying hyperextension pressure to the joint. Uke taps when the pressure is felt.
- 1
Secure uke's wrist
Grip uke's wrist firmly with both hands — one on the wrist, one on the forearm. Pull the arm straight and away from uke's body.
- 2
Position uke's arm palm-up
Rotate uke's arm so the palm faces upward (supine position). This orients the elbow for hyperextension rather than a natural bend.
- 3
Place the knee at the elbow
Lower your knee to the ground directly against the back of uke's elbow joint. Your knee is the fulcrum of the lever.
- 4
Confirm the arm is straight
Ensure uke's arm is fully extended with the elbow resting against your knee. A bent elbow has range of motion that delays the lock.
- 5
Apply lever pressure
Press your knee downward against uke's elbow while lifting uke's wrist upward toward your body. The lever action hyperextends the elbow. Uke taps or the lock is maintained.
What Makes It Work
- The knee must be precisely at the elbow joint — not above it (upper arm) or below it (forearm).
- Palm must face upward (arm supinated) to expose the elbow to hyperextension in the natural anatomical direction.
- Wrist control must be tight and with two hands — a loose single-hand grip allows uke to rotate their arm to escape.
- Apply pressure gradually and with control — this is a joint lock and excessive speed can cause injury before uke can tap.
What to Avoid
Knee positioned on the forearm or upper arm instead of the elbow
The fulcrum must be precisely at the elbow joint. Misplacement means the lever misses the joint and the lock fails.
Arm pronated (palm down) instead of supinated
Palm down orients the elbow's natural bend direction toward the lock, which reduces the hyperextension angle and allows uke to flex against you. Rotate the arm palm-up.
Single-hand wrist grip
Use two hands on uke's wrist and forearm to prevent rotation. A single-hand grip allows uke to twist their arm out of the lock.
Applying pressure too quickly
Joint locks must be applied with control. Fast application prevents uke from tapping in time and risks injury.
Best Moments to Apply Hiza-Gatame
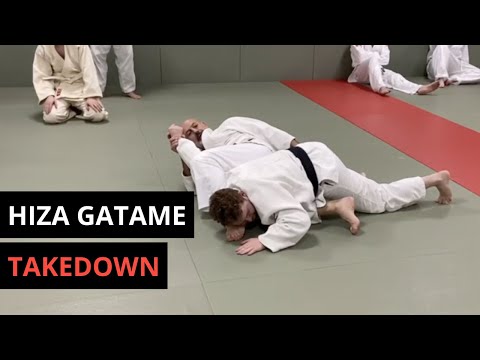
Hiza-Gatame is most commonly applied in the transition from tachi-waza (standing) to ne-waza (ground work) — when uke lands and their arm is exposed. It is effective when uke tries to post on an outstretched arm while being thrown, or when uke pushes up with a straight arm from the bottom. The standing/kneeling position makes it a fast application technique.