Quick Facts
- Category
- Nage-Waza
- Subcategory
- Ma-Sutemi-Waza
- Difficulty
- Advanced
- Belt Level
- 2nd kyu, 1st kyu, 1st dan
Hikikomi-Gaeshi is an advanced sacrifice throw where tori pulls uke down on top of themselves and rolls, reversing their relative positions so that uke ends up on the bottom. It is classified as ma-sutemi-waza because tori falls straight backward. The technique requires a strong pulling action and good timing — it is often used as a counter or when uke has a very strong defensive grip pulling backward.
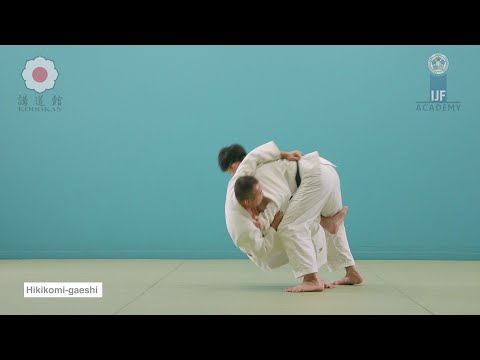


Hikikomi-Gaeshi — Step by Step
Tori pulls uke strongly forward and downward, loading uke's weight onto tori. Gripping the sleeve and lapel, tori pulls uke down in front of them, loading uke's weight onto tori's chest. The kuzushi draws uke's center of mass forward and over tori.
Step or sit in directly in front of uke, placing one foot or both feet against uke's body (typically at the hip or thigh level) while gripping uke tightly. The position is immediately in front of uke with both parties in close contact and tori beginning to fall backward.
Fall straight backward (the sacrifice) while pulling uke forward with the grips. As tori falls back, the foot(s) placed at uke's hip or thigh area push upward, combining with the backward roll to flip uke over tori. Tori rolls through to end up on top or in a pin position.
- 1
Pull uke strongly forward and down
With strong grips on sleeve and lapel, pull uke forward and downward, loading their weight onto you.
- 2
Drop in front of uke
Drop to the ground directly in front of uke, falling backward. Maintain the pulling grips throughout.
- 3
Place foot at uke's hip or thigh
As you drop, place one or both feet against uke's hip or thigh area. These feet will act as a lever in the throw.
- 4
Pull and push simultaneously — sacrifice
Pull uke forward with the grips while pushing upward with the feet at uke's hips. Tori rolls backward; uke is thrown forward and over.
- 5
Roll through to control position
Continue rolling through the movement to come out on top of uke in a control or hold-down position.
What Makes It Work
- The sacrifice is total — tori falls backward completely and relies on the mechanics of the roll to reverse positions.
- Timing the foot placement at uke's hips with the backward fall is the critical coordination challenge.
- Hikikomi-Gaeshi must be committed fully. A half-hearted fall leaves tori exposed on the ground without completing the throw.
- Follow-through to a control position is essential — the throw is incomplete if tori does not come out in a dominant position.
What to Avoid
Not falling far enough backward — stopping halfway
The sacrifice must be complete. Fall fully backward. Stopping halfway strands you under uke without completing the throw.
Losing grip during the fall
Maintain both grips throughout the fall and roll. The grips control the direction of uke's throw.
Foot placement too high or too low on uke
Feet should be at hip or thigh level — the fulcrum point for flipping uke. Too high or too low reduces the lever effect.
Not rolling through after the throw
Roll through completely to reach a dominant position. A stalled roll leaves both parties in an unclear position.
Best Moments to Apply Hikikomi-Gaeshi
Hikikomi-Gaeshi is used when uke has a strong backward grip pulling tori toward them, or as a counter when uke is resisting with a strong forward posture. It is also used when an exchange of throwing attempts leads to a clinch and tori chooses to sacrifice. Advanced practitioners use it when both competitors are pulling strongly in the same direction.
Variations of Hikikomi-Gaeshi
Combination Sequences
Attack these first
Follow up with